A Guide to Screen recording on Windows 10
With Windows 10, you get some excellent multimedia capabilities out of the box, such as screen recording. Screen recording is the process of capturing everything that happens on your screen, both audio and video.
This can be a great way to show others how to complete a task or solve a problem.
Screen recording is straightforward on Windows, thanks to its built-in tools. There are also third-party screen recording applications available for Windows 10 that provide more sophisticated features.
For a primer on making great screen recordings, check out our seven tips to make your screen recording easy to follow.
Are you looking to record your screen on other popular platforms? If yes, refer to the relevant guide for your preferred platform:
Which screen recording software works with Windows 10?
There are two different ways to record your screen in Windows 10:
Using desktop software.
Windows 10 has a built-in tool called Game Bar to help you record your screen. Instructions on using Windows 10 Game Bar for screen recording are listed below.Using third-party browser-based screen recording software.
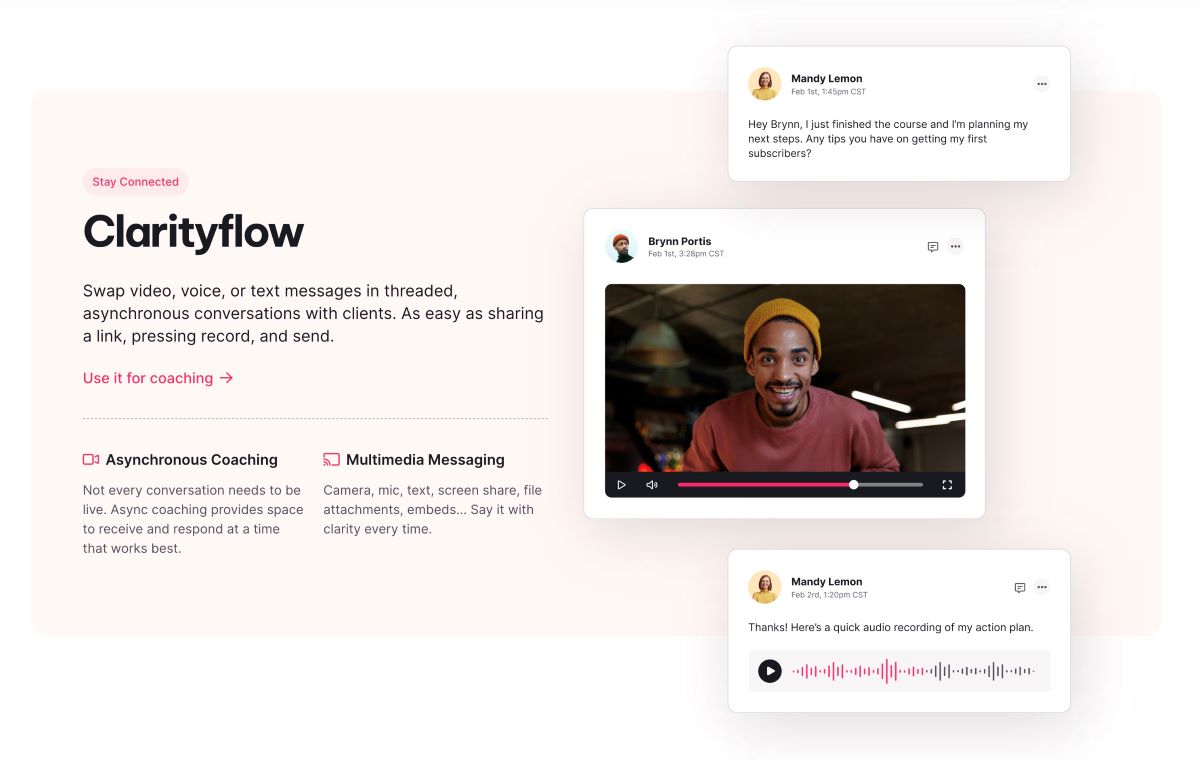
These tools don’t require anything to download or install, can be conveniently viewed on any device, and it's easy to share recordings with team members and clients. Clarityflow is built specifically for this.
How to record your screen in Windows 10 using the Game Bar
The Game Bar is an app that comes free with every new version of Windows 10, and it's intended to assist gamers in monitoring the performance of their computer. Even if you aren't using the device to play games, it's simple to utilize its screen recording function.
Follow these steps to record your screen:
1. Open the application or window you'd like to record on your PC.
2. Now, open the Game Bar by pressing the Windows key + G on your keyboard.
Quick Tip: If the Windows Key + G keyboard shortcut doesn't launch the Game Bar, ensure it's enabled. To do this, search "Game bar settings'' and open the menu that appears. Make sure the "Enable Xbox Game Bar" option is toggled on.
3. The default position of the recording tools is in the top-left corner, in a window labeled "Capture." If it's not there, go to the top of the screen and look for a webcam symbol on the long toolbar.
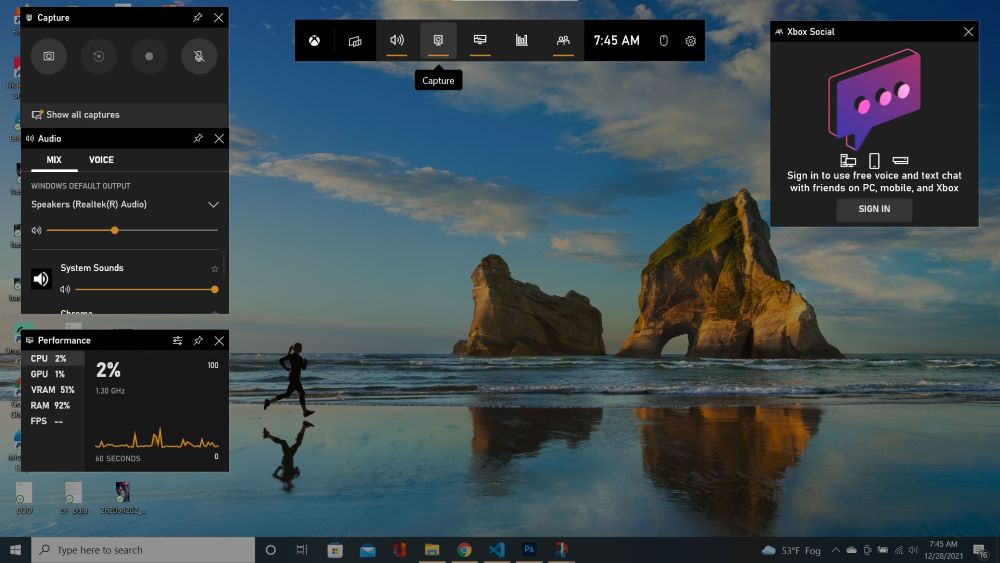
4. To begin capturing a screen, click the white circle icon in the Capture window. A tiny bar will appear on the right side of the screen, indicating how long you've been recording.
Quick tip: You may start a Game Bar screen recording at any time by pressing the Windows Key + Alt + R.
5. If you want to record your own voice, simply click the microphone icon, and it will begin recording sound from your default microphone.
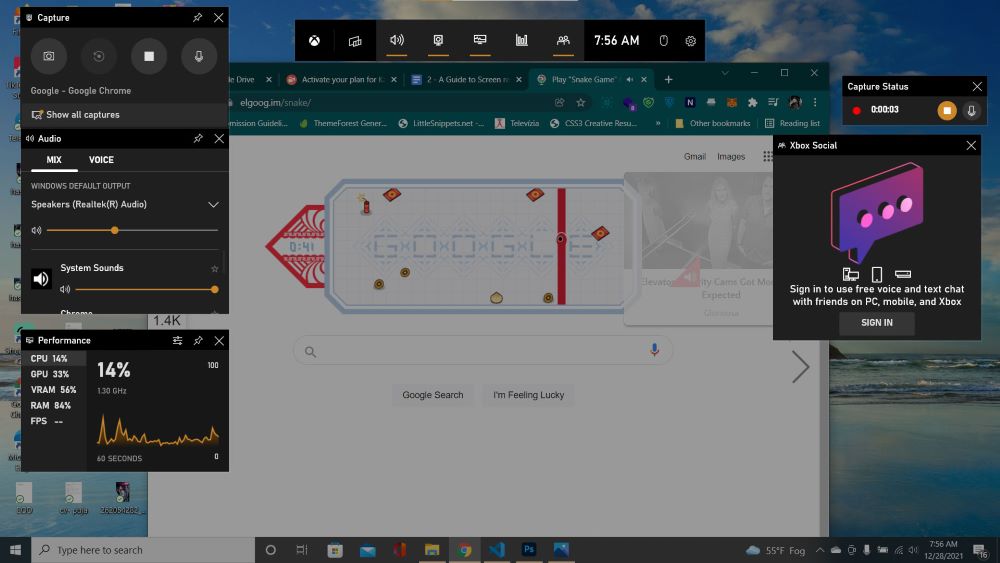
6. When you're done recording, click the stop icon on either the recording timer or in the Game Bar menu.
7. The new screen recording will be in your PC's "Videos" folder, under "Captures," and you'll be able to locate it there.
Windows 10 Game Bar screen recording issues
While it's a valuable tool, some users have reported a couple of issues with screen recording using the Game Bar. These include the Game bar interface not always showing up (so you won't know whether or not it's actually recording) and inconsistent performance.
Desktop screen recording software like the Windows 10 Game Bar can experience issues due to being resource-intensive. This can be a particular problem if you're trying to record a game or other high-end activity.
To avoid potential recording problems, we recommend using a browser-based screen recorder like Clarityflow. It has all the same benefits as desktop software but runs without impacting system performance and is also cross-platform compatible.
How to share your Windows 10 screen recordings with others
When you stop the Windows 10 screen recorder, the new recording will be saved to your PC's "Videos" folder under "Captures.” You'll be able to locate it there. Search for a .mpg, .mpeg, or .avi extension.
You can then upload your screen recording video file to a tool like Clarityflow to start a video messaging conversation with someone.
(Alternatively, you can simplify the whole process by using Clarityflow to record your screen and then share the link to view your recording.)
How to ask your clients on Windows 10 to record their screen
Do you want a client to react to your screen recording or provide feedback on your project? Why not request a screen recording from your customer?
To do so, you can ask them to follow the steps above and then figure out a way to send you their recording.
Alternatively, you can use Clarityflow and simply send them a link where they can record their screen using their web browser. Give it a go for free today.